![]()
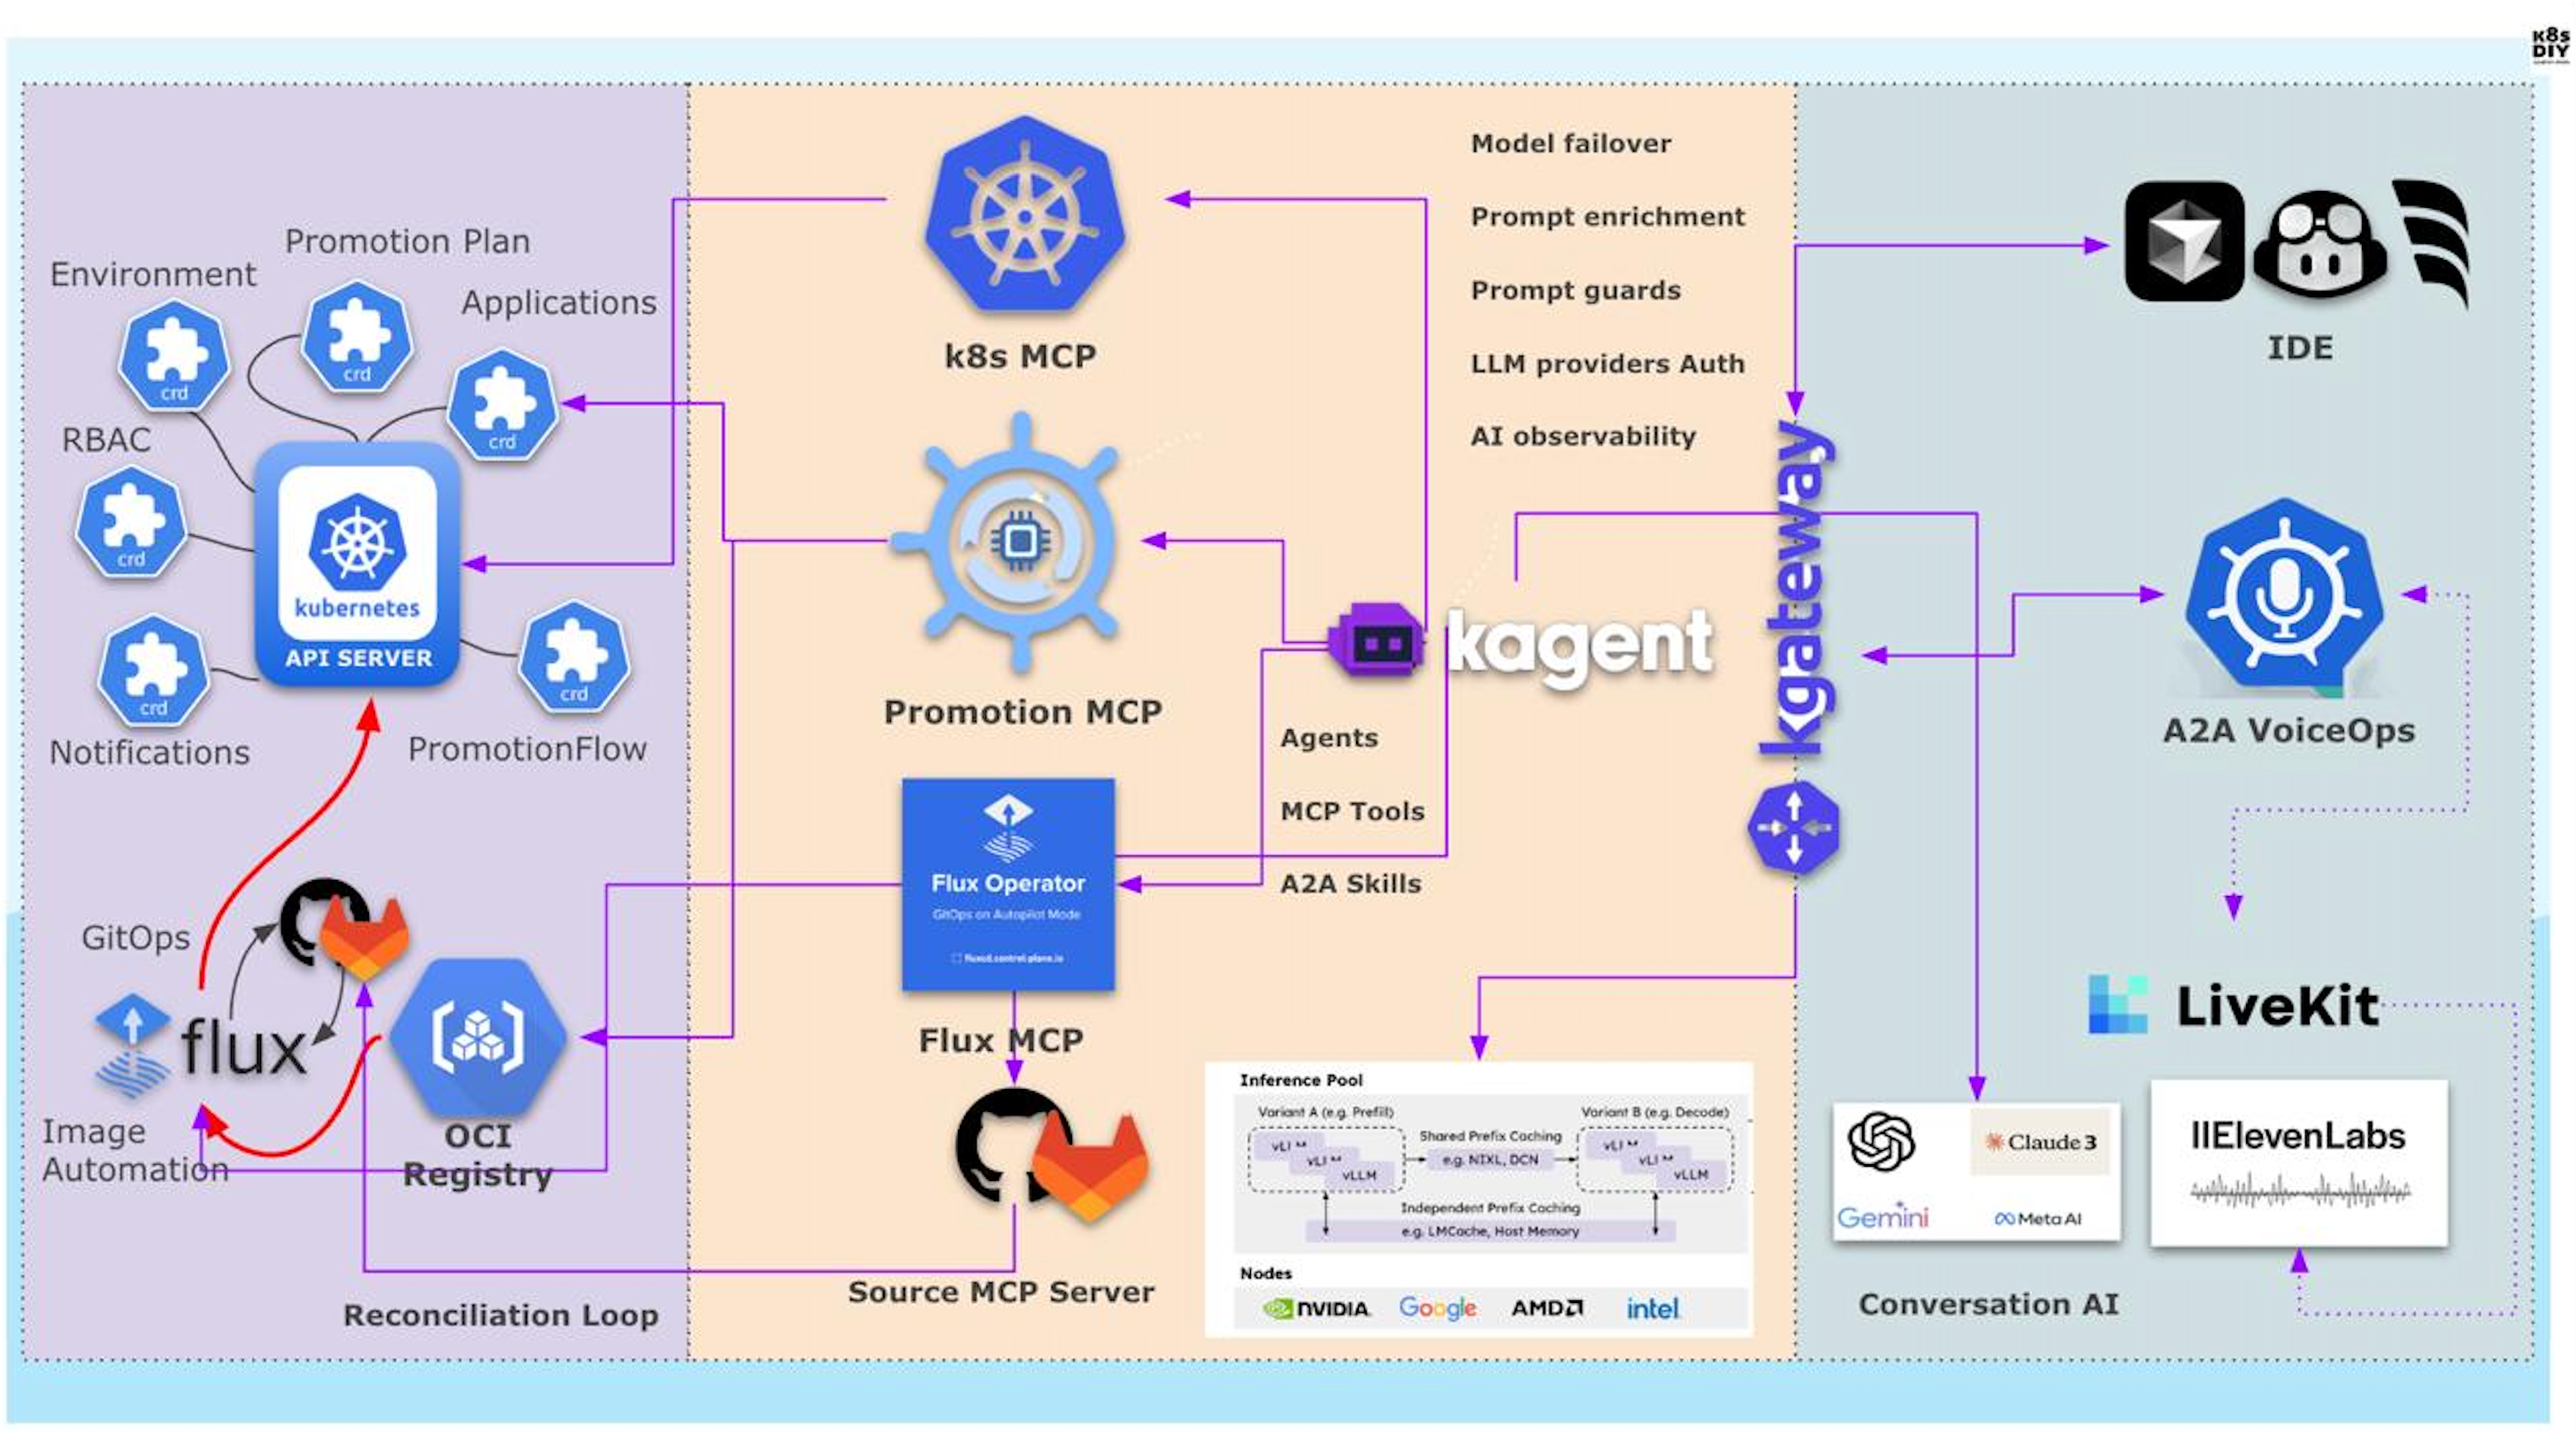
A conversational AI agent and voice assistant application built with the LiveKit Agents framework, capable of using Model Context Protocol (MCP) tools to interact with external services for SRE and Kubernetes operations.
- Features
- Quick Start
- Example: Running a Sample MCP Server
- Sample Prompts
- Prerequisites
- Configuration
- Project Structure
- Testing
- Troubleshooting
- Contributing
- Acknowledgements
- Getting Started with Kagent Integration
- Voice-based interaction with an AI assistant
- Integration with MCP tools from multiple external servers (flexible config)
- Speech-to-text (OpenAI Whisper)
- Natural language processing (OpenAI GPT-4o)
- Text-to-speech (ElevenLabs)
- Voice activity detection (Silero)
- Note: This agent currently supports only HTTP/SSE MCP servers. NPX/subprocess-based MCP server support will be added in the future.
⚠️ WARNING: Use Caution with Real Kubernetes Clusters
This agent can create, modify, and delete resources in your Kubernetes cluster. Always review your configuration and tool restrictions before connecting to a production or sensitive environment. Test in a safe environment first.
- Create and activate a Python virtual environment:
make venv source venv/bin/activate - Install dependencies:
make uv # (optional, for fast installs) make install - Set environment variables:
export OPENAI_API_KEY=your_openai_api_key
export ELEVEN_API_KEY=your_elevenlabs_api_key
- Configure MCP servers in
mcp_servers.yaml(see below for details). - Run tests:
make test - Run the agent:
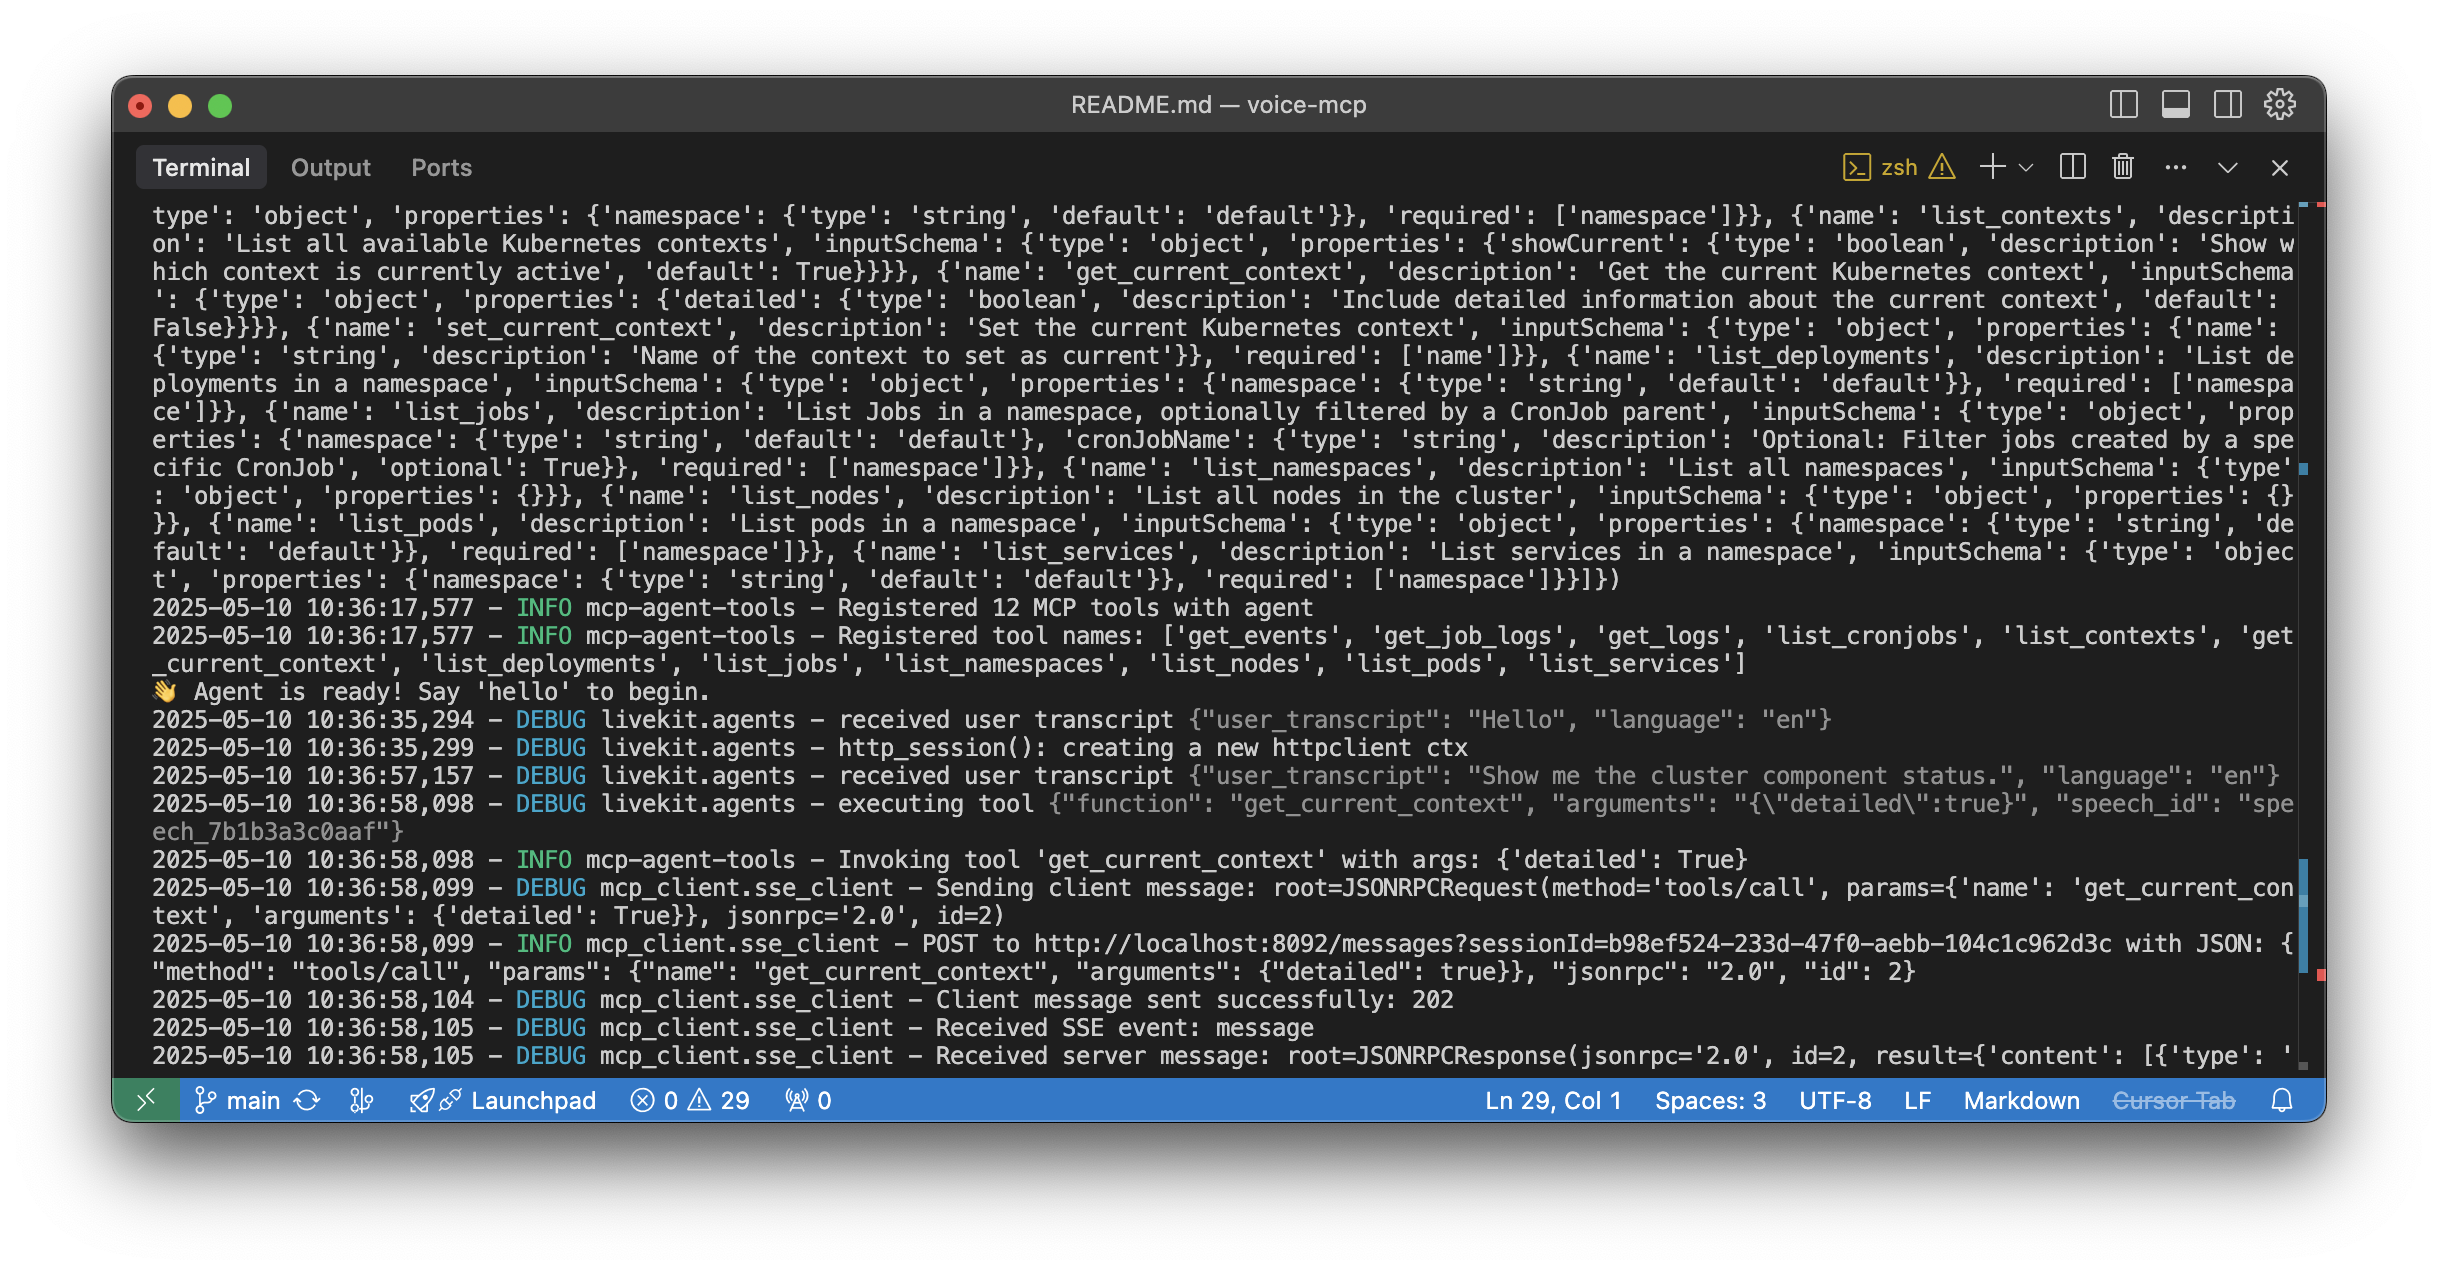
make run
- 👋 Agent is ready! Say 'hello' to begin.
To run a sample MCP server that only allows non-destructive tools, use the following command:
ALLOW_ONLY_NON_DESTRUCTIVE_TOOLS=true ENABLE_UNSAFE_SSE_TRANSPORT=1 PORT=8092 npx mcp-server-kubernetesALLOW_ONLY_NON_DESTRUCTIVE_TOOLS=truerestricts the server to non-destructive tools only.ENABLE_UNSAFE_SSE_TRANSPORT=1enables SSE transport for local testing.PORT=8092sets the server port.
You can then point your agent's mcp_servers.yaml to http://localhost:8092/sse.
Supergateway allows you to expose stdio-based MCP servers over SSE or WebSockets. This is useful for tools like kubectl-ai that only support stdio interfaces e.g. for kubectl-ai MCP agent (https://github.com/GoogleCloudPlatform/kubectl-ai)
To run kubectl-ai as an MCP server via Supergateway:
npx -y supergateway --stdio "kubectl-ai --llm-provider=openai --model=gpt-4.1 --mcp-server" --messagePath / --port 8008Then add this to your mcp_servers.yaml:
servers:
  - name: kubectl-ai-mcp
    url: http://localhost:8008/sse
Supergateway creates an HTTP server that:
- Listens for SSE connections at
http://localhost:8008/sse - Forwards messages to the stdio-based MCP server
- Returns responses back to clients
Try these example prompts with your agent:
-
Show all resources in a namespace:
show me all resources in default namespace
-
List all pods:
list pods in dev namespace
-
Describe a pod:
describe pod my-app-123 in default namespace
-
Get recent events:
get events from the prod namespace
-
Scale a deployment:
scale deployment my-app to 3 replicas in dev
-
Get logs from a job:
get logs from job backup-job in default namespace
-
List all deployments:
list deployments in prod
-
Python 3.9+
-
API keys for OpenAI and ElevenLabs
-
At least one MCP server endpoint
-
npx (Node.js) is required to run the sample MCP server. If you don't have npx, install Node.js from nodejs.org.
OS-specific tips:
- macOS: You can also install Node.js with Homebrew:
brew install node - Linux: Use your package manager (e.g.
sudo apt install nodejs npmfor Ubuntu/Debian) or download from nodejs.org. - Windows: Download the installer from nodejs.org and follow the setup instructions.
- macOS: You can also install Node.js with Homebrew:
Edit mcp_servers.yaml in the project root. Example:
servers:
  # Example: Allow only non-destructive list and describe tools from a local Kubernetes MCP server
  - name: k8s-mcp-server
    url: http://localhost:8092/sse
    allowed_tools:
      - list_*           # allow all list tools
      - describe_*       # allow all describe tools
      - get_*            # allow all get tools
The agent connects to the specified LiveKit room and loads all MCP servers/tools from your config.
The agent supports HMAC authentication for MCP servers that require it. To configure authentication:
- Add an
authsection to your server configuration inmcp_servers.yaml:
servers:
  - name: secure-mcp-server
    url: https://example.com/sse
    allowed_tools: [*_*]
    auth:
      type: secret_key
env_var: MY_SECRET_KEY- Set the environment variable specified in
env_var:
export MY_SECRET_KEY=your_secret_key_hereThe authentication system:
- Supports HMAC-SHA256 signatures
- Automatically handles base64-encoded keys
- Signs each request with the provided secret key
- Adds the signature as an
authparameter in the request
For MCP servers that use different authentication methods, you can modify the auth.py file or extend the authentication middleware.
The agent supports connecting to A2A (Agent-to-Agent) servers, allowing you to use skills from other AI agents as tools. This is useful for integrating with external AI services or custom agents that expose their own skills.
To add an A2A agent, use the type: a2a field in your mcp_servers.yaml:
servers:
  - name: my-a2a-agent
    type: a2a
    url: https://my-a2a-agent.example.com
    allowed_tools: [*]  # (optional) restrict which skills are available
    headers:
      Authorization: Bearer <token>  # (optional) custom headers for auth
type: a2atells the agent to treat this server as an A2A agent, not a standard MCP server.- The agent will automatically discover available skills from the A2A agent's
/\.well-known/agent.jsonendpoint. - Each skill is exposed as a callable tool. You can invoke these skills by natural language or by specifying the tool name.
- You can use
allowed_toolsto restrict which skills are available to the agent.
Use cases:
- Integrate with external LLM agents, chatbots, or custom AI services that expose skills via the A2A protocol.
- Chain together multiple agents, each with specialized capabilities.
See the A2A protocol documentation for more details on how to implement your own A2A agent.
VoiceOps can be integrated with Kagent, an open-source framework for running agentic AI in Kubernetes environments. Kagent enables DevOps and platform engineers to automate complex operations, troubleshoot issues, and manage cloud-native resources using AI agents.
- Unified AI Operations: Leverage Kagent's built-in tools for Kubernetes, Prometheus, Istio, Argo, Helm, and more.
- Autonomous Agents: Run agents that plan, execute, and analyze operational tasks in your cluster.
- Extensible Framework: Easily extend with custom tools and agents for your specific workflows.
- Deploy Kagent in your Kubernetes cluster:
- Follow the Kagent documentation for installation instructions.
- Configure Kagent as an A2A server:
- In your
mcp_servers.yaml, add your Kagent A2A server endpoint:
    - name: k8s-a2a-agent
      type: a2a
      url: http://a2a.mockee.me/api/a2a/kagent/k8s-agent
- In your
- Start VoiceOps:
- Run VoiceOps as usual. The agent will now be able to use Kagent's tools for cloud-native operations.
- Diagnose application connectivity and performance issues
- Automate traffic management and alerting
- Run intelligent troubleshooting and remediation tasks
For more details, visit the Kagent website and explore the documentation and community resources.
main.py: Entry point for running the agentagent_core.py: Core agent logic and orchestrationtool_integration.py: Integration layer for MCP toolsa2a.py: Agent-to-Agent (A2A) protocol supportmcp_config.py: MCP server configuration loader and utilitiestest_agent_config.py: Unit tests for agent configurationmcp_servers.yaml: MCP server and tool configuration fileMakefile: Common development and setup commandssystem_prompt.txt: System prompt and instructions for the agentexample/: Example scripts for A2A client/servera2a-client.py: Example A2A client scripta2a-server.py: Example A2A server script
mcp_client/: MCP client integration package__init__.py: Package initializeragent_tools.py: MCP tool definitions and logicauth.py: Authentication middleware for MCP serversserver.py: MCP server connection handlerssse_client.py: SSE client for MCP communicationutil.py: MCP client utilities
Run unit tests:
make testIf you see an error like:
aiohttp.client_exceptions.ClientConnectorCertificateError: Cannot connect to host api.elevenlabs.io:443 ssl:True [SSLCertVerificationError: (1, '[SSL: CERTIFICATE_VERIFY_FAILED] certificate verify failed: unable to get local issuer certificate (_ssl.c:1006)')]
- Run the Install Certificates script for your Python version
make certs-macos- Ensure
ca-certificatesis installed and updated.
make certs-linux- Create the venv with a Python that has access to system certificates.
Do NOT disable SSL verification in production.
If you encounter errors such as invalid_function_parameters, Invalid schema for function, or similar messages from the LLM or MCP server, it usually means your tool schema is not valid or not compatible with the LLM's requirements.
- Double-check your tool's JSON schema in
mcp_servers.yamlor your MCP server configuration. - Ensure all required fields, types, and nested schemas are correct and follow the JSON Schema specification.
- For OpenAI function calling, see OpenAI Function Calling docs.
- Refer to the official documentation of the MCP server you are using for the correct schema format and requirements.
Contributions, feedback, and ideas are welcome!
- Fork the repository on GitHub.
- Clone your fork to your local machine:
git clone https://github.com/your-username/voice-mcp.git cd voice-mcp - Create a new branch for your feature or fix:
git checkout -b my-feature-branch
- Make your changes and add tests if applicable.
- Commit your changes:
git add .
git commit -m "Describe your change"
- Push to your fork:
git push origin my-feature-branch
- Open a Pull Request on GitHub, describing your changes and why they should be merged.
- Discuss and address feedback from maintainers or other contributors.
For major changes, please open an issue first to discuss what you would like to change.
Make sure to follow best practices and keep the codebase clean and well-documented.
Let's build something great together!
- DeepLearning.AI short course Building AI Voice Agents for Production
- LiveKit
- OpenAI
- ElevenLabs
- Silero
- Kubernetes and the broader CNCF ecosystem
- httpx and anyio
- The Python, Node.js, and open source communities
- All contributors, testers, and users who help improve this project
- Inspiration from the Model Context Protocol (MCP) and related projects
- This project was created in the spirit of Vibe Coding - when human creativity, collaboration, and a personal passion come together with AI to create something amazing.
This project is licensed under the